Home Blog Page 3

Setup PHPUnit Tests on Pull Request for Laravel with GitHub Actions

0

Recently, Github released Actions beta for developers to let them try it.

Github actions are a way to automate your workflow in many ways. You can use some events triggers to do something. These events can be anything like a branch push, pull request open/push, and so on. I will not dig deeper into this now because it’s not the scope of my article.

github actions

via.

However, when discovering them, I asked myself: Can I use it to run PHPUnit tests on my Pull Requests, to avoid using external tools like Travis CI? I love Travis but hey, let’s play with it.

The answer is yes. Here is how I did it and how I created a workflow for it.

But first, some basics.

What is a Workflow?

A Workflow is an automated process you can create to tell Github that it must do something when something else happens. This may involve everything like testing, building, deploying, and so on. Workflows are stored under the .github/workflows directory in your repository, as .yml files.

Once they are versioned in the repo, Github will read them, validate them, and finally run them when the specified condition is triggered.

Ok, how do I make it?

I will copy/paste mine and then explain it.

Note: this is specific to Laravel. My app uses the 5.8 version of the framework.

Note 2: I prepared a .env.testing file with some specific settings I want to use when running PHPUnit.

Let’s see what we have:

  • name: no need to explain it. It’s just the name I gave to the workflow;
  • on: this is the condition you want to check to fire the workflow. In my specific case, I wanted to trigger a test run at every pull request open/push, to link this action launch as a condition to let me merge my PR branch (more details here);

At this point, I put my job inside the jobs item of the file. I named it run-tests. This is not something standard, and you can choose the name you want here.

Let’s see what we have inside a single job item:

  • runs-on: ok, here we can specify the OS we want to run our tests on. I use Ubuntu 18.04 in my production environment, so I decided to use the same while running tests;
  • container: here, we can select the container we want to run our tests on. I decided to use this prooph/composer image to have everything I need for a Laravel app. I used the 7.2 version to reflect what I have in production;
  • services: here, you can specify some extra services to be used during tests. In my specific case, I added a Redis instance because I have some functional tests that I need to cover a complete use case of my app;

The preparation part is done. Now…

The Steps

Steps are the most atomic part of your workflows. As you can see from the snippet, they are a sequence of commands I run to prepare everything and, finally, run tests.

The only exception is the first one, uses/checkout. You can find more about it here: https://github.com/actions/checkout.

And that’s it!

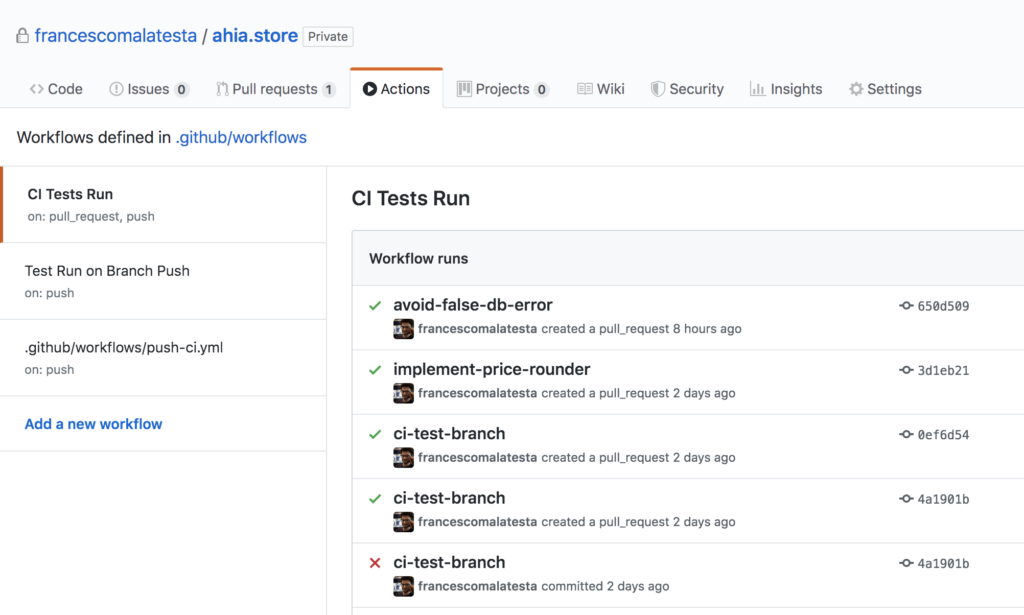
The icing on the cake: Github will automatically add the status check for every pull request from this moment on, and will re-run tests at every push on your branches (if a related PR is open).

Hope you will enjoy it!

La Comunicazione – Creare un Negozio con Shopify – Il mio Primo Anno

1

Questo articolo è parte di una serie che ho scritto per raccontare di tutto quello che ho imparato nel mio primo anno da Shopify owner. Clicca qui per l’indice.


Dopo aver parlato del prodotto, adesso tocca parlare di quello che ho imparato riguardo la comunicazione con i propri clienti (e non solo). Nel corso dell’ultimo anno, infatti, mi è capitato di parlare con tantissime persone. A volte per una lamentela, per un problema con la logistica, a volte per ricevere un complimento o sorridere leggendo una risposta in dialetto.

(è un gioco di parole: “San Ceppat”, cioè “si è inceppato”. Le pallotte sono un piatto tipico della nostra regione)

Ogni parola è importante

Mi è capitato di rispondere a domande di potenziali clienti curiosi, letteralmente, ad ogni ora del giorno. Ogni singola ora del giorno, dalle sette di mattina a mezzanotte. A volte non sono riuscito a rispondere sul momento, com’è normale che sia (siamo pur sempre esseri umani con una vita) ma in linea di massima occorre ricordare un principio tanto semplice nella sua essenza quanto semplice da scordare: ogni singola parola che rivolgiamo a qualcuno che ci scrive è un biglietto da visita.

Sempre, senza eccezioni. Dall’altra parte c’è qualcuno che è interessato e probabilmente vuole comprare la tua merce. Ha già fatto un passo, un bel passo: dagli una mano. Come? Ecco qualche spunto:

Il Prodotto – Creare un Negozio con Shopify – Il mio Primo Anno

1

Questo articolo è parte di una serie che ho scritto per raccontare di tutto quello che ho imparato nel mio primo anno da Shopify owner. Clicca qui per l’indice.


In questo primo articolo voglio parlare di tutto quello che ho imparato a proposito del prodotto da vendere su un negozio Shopify, della sua natura e di come i prodotti che scegliamo di vendere influiscono non solo sul risultato finale, ma anche e soprattutto sul come affrontiamo il lavoro giorno dopo giorno.

Creare un Negozio con Shopify – Il mio Primo Anno

2

Un anno e qualche settimana fa, dopo aver chiuso tutti i miei vari side project (perlopiù improduttivi), mi sono buttato a capofitto in qualcosa di totalmente nuovo per me. Quelli che mi conoscono sanno che sono uno sviluppatore software, abbastanza attivo e molto curioso.

Un bel giorno arriva un’amica, che conosco da più o meno 25 anni. Siamo entrambi di Vasto, una cittadina sulla costa Abruzzese. Questa amica, dal nulla, è riuscita a costruire qualcosa di davvero entusiasmante: partendo quasi per gioco ha iniziato a disegnare e stamparsi delle magliette. All’inizio ha semplicemente sperimentato, poi ha trovato un suo filone, rifacendo tutti i brand più famosi usando parole del dialetto della nostra regione.

Un concept semplice, magari già visto in altre regioni. Tuttavia, come le esperienze degli ultimi anni mi hanno insegnato, non è mai l’idea ad essere importante: è la sua esecuzione.

How to Handle your Shopify App Review Process

0

A few days ago, my first Shopify application, “Ahia! – Easy Price Changer” was approved after a ten days review process and published on the Shopify App Store.

It was my first experience with the Shopify applications review process. I want to be honest: I was a little skeptical about it at first. I thought it would be a really basic review without any meaningful insights.

I was wrong.

The feedback was awesomely helpful to me. So, I decided to share what I learned to help everyone in the same situation. Let me know if you want to add something you feel it’s important in the comments!

Che cos’è questo Laravel Vapor e perché non vedo l’ora di provarlo

0

Una delle cose che mi affascina di Laravel (e che nel tempo mi ha fatto continuare ad usarlo per una marea di progetti) è il suo ecosistema.

Un paio di settimane fa ho mandato in review la mia prima app Shopify, creata con React per il frontend e, ovviamente, Laravel per il backend. Prossimamente ne parlerò meglio.

Grazie a Forge, nell’arco di circa due ore di lavoro ho messo su un server di stage ed uno di produzione, automaticamente collegati al push sui rispettivi branch su Github.

Grazie ad Horizon, nel giro di pochi minuti mi sono ritrovato con un’ottima interfaccia per monitorare l’esecuzione dei vari job.

Inutile dire che quando ho sentito parlare di Laravel Vapor durante l’ultimo Laracon (al quale non sono mai andato e forse è il caso di porre rimedio alla cosa…) la curiosità è schizzata subito alle stelle.

Quindi… cerchiamo un attimo di capire di cosa si tratta!

Building a Laravel Development Environment with Docker, Vessel and… LaraPrep!

0

Once upon a time…

… I used to develop my applications in a Vagrant/Homestead development environment. It worked pretty well, I remember using it for a lot of projects, but soon performances decreased, especially in large projects/codebases.

Sure, I was able to make some optimizations and tweaks here and there, but it was mostly a palliative. I knew I needed something different.

Then, Docker arrived. So I started my research of a cool Laravel application development environment. 

I loved the way Docker made everything easier regarding development environment organization. Sure, it has a very steep learning curve (especially at the beginning), but it was worth it.

The next step was quite obvious: find a set of scripts to make the provisioning of a new dev environment as easier as possible.

The 2018 Mighty Laravel Application 20 Optimization Ideas Checklist

0


Here we go! Your Laravel application is now in production. You are online, ready to start making a lot of mecha-gazillion dollars.

Roses are red, violets are blue, tests are green and you feel so cool.

First user. Ten users. One hundred users. A thousand users! Suddenly, the more you go forward, the more your application becomes slower.

What should you do? Well… Devil is in details.

After some searching, I decided to create this list of 20 tips you can use to boost your Laravel application to a new level.

Monitoring a Laravel Application with Telescope

2

I am always excited when a new Laravel ecosystem product comes out. I am not a fanboy, I have always been skeptic and critic about some parts of the framework when I don’t like them, but there is something (among many others) I love about Laravel: its pragmatism.

So, every single time they release something new I am 100% sure that it’s something that can be useful, no matter if paid or not (the cure the team put in it makes nearly impossible to feel the difference).

Today I want to talk a little bit about Laravel Telescope, a debugging tool for Laravel applications. On the Telescope Github page is defined as an “elegant debugger assistant”.

Dall’Actor Model alla Pratica – Giocando con I Processi in Elixir

0

Il mio viaggio in Elixir prosegue e, devo ammetterlo, è sempre più stimolante. Non soltanto da un punto di vista strettamente “tecnico” ma anche da quello legato alle inclinazioni personali, legate all’apprendimento (ed insegnamento) di qualcosa di nuovo.

Qualche settimana fa ho spiegato, partendo da un ottimo articolo in inglese, cos’è l’actor model. Qualche giorno fa, invece, ho spiegato come installare Elixir e configurare un primo progetto. Oggi mettiamo in pratica tutto quello che abbiamo visto: scriveremo del codice creando una piccola applicazione che fa uso di processi!

Ehm, cosa?

In Elixir, ogni singola riga di codice viene eseguita in un processo. Non parliamo dei processi “classici” a cui siamo abituati: parliamo invece di quelli della BEAM, la VM su cui gira il codice che noi scriviamo.

Ora, Elixir è un linguaggio fortemente orientato alla concorrenza e alla scrittura di applicazioni che fanno più cose contemporaneamente (per davvero). Un processo della BEAM è molto più leggero di quelli a cui siamo abituati, tant’è che su una macchina normalissima è possibile crearne centinaia di migliaia e farli lavorare contemporaneamente senza nessun problema.

Non perdiamoci in chiacchiere, iniziamo da cose semplicissime per poi renderle più interessanti!